Thursday, November 5, 2009

Identifying Checklist for You Adsense Website


Check your website for correctness
Check your web site fully. There should no broken links. Site layout and fonts should be appropriate throughout the site. You should validate your HTML pages. Your website should be search engine friendly.

Apply for Adsense account
Check that you web site should be completed fully and there is no broken links before applying for the adsense account.

Wait for the approval of Adsense Account
Goolge usually takes 2-3 days to approve adsense account. Once approved they will send you the welcome email along with the required information related to your account.

Adding google adsense code
Once account is approved you can logon to your adsense account and create adsense code. Copy the adsense ads code and then paste in all your pages of the website.

Next step is to Drive traffic to your website
To drive traffice to your site you can promote your website in search engines, write articles and post in the article databases. You can also send newsletters to your targetted audicance for getting more hits.

Guide to Maximize Adsense Revenue


Here are the ways to maximize your adsense revenue

More visitors to your site
Promote you web site (web site promotion) to get more visitors to your web site. More visitors will definitely click on ads, so your revenue will increase.

Create and interlinks more pages
You can create more and more pages and and interlink them to increase the page views on your web site. Increased pages views will Maximize your adsense revenue.

Choose the high paying adsense key words
Use the high paying keywords in your web site to increase the per click income.

Tweak the ads placement
Tweaking the ads placements to suit you web site will generate more clicks and in turn you will earn more.

Ads format
Text format ads perform well so try the text format ads on your web site and choose the best format that works for your web site.

Tricks To Earn Huge money from Adsense ads

Here are few adsense tricks that can help you increase you income without much investment.

Adsense Trick -1 : Check you Keyword density
Check the keyword density of your page, this will help you forecasting of ads that will be displaying on your pages. You can also adjust you pages to target particular type of ads.

Adsense Trick -2 : Update you page to target towards some ads
You can also update you page content to target some keywords.

Adsense Trick -3 : Build theme based content for better result
Make the pages of the related topic, you can use the keyword suggestion tools to achieve this.

Adsense Trick -4 : Increase you web site page count
You should write one or more pages per day to increase number of pages on you website. When you create more quality content you will start getting more visits to you web site and your income will keep on increasing.

Adsense Trick -5 : Use the best adsense ads format on your web site
Research on the ads format and then display the best ads on your pages.

Adsense Trick -6 : Use the right color combination for your ads
Use the ads color matching with your page theme.

Tuesday, October 27, 2009

Utility of Domain Name


Domain name plays a very important role in web business. In web business only the best domain names are taken and better are set aside. But they don’t always stay taken.

It is a fact that, Domain names often come back on top of the market. Yet earlier than they do, domain name prospectors are sifting through them to search out the gold domains from between them.

What is the reason behind the availability of domain names again?

As studies conclude, thousands of domain names expire every day and remaining domains are offered for sale. The reasons behind it are diverse and are given below:

Negligence:

There are several webmasters who forgets to renew the domain parallel to their expiry date. Due to which the email address where the domain is registered becomes invalid, and the domain name registrant doesn’t obtain the restitution notices.

The following are the possible reasons for this:

Reasons

1. Scarcity of need or funds

2. The company that had registered the domain left the business.

3. The website owner loses curiosity in or doesn’t have sufficient time for the website.

4. The website owner doesn’t have funding to prolong the website venture.

5. The domain name registrant registered abundant domains on speculation and couldn’t afford to continue renewing unexploited domains.

Revenue:

1. The domain name registrant might come to understand what domain’s worth is and choose to sell it.

2. The domain name registrant may have registered the domain because he/she came to realize its impending worth, along with putting an aim to sell it later.

Which secret forms a formerly registered domain name valuable?

There are several reasons to argue, why would anyone pay so much for e.g. $750,000 for a domain when they could register a new domain for under $10?

1. Immediate traffic

For the condition if the domain name previously was pointed to a website, search engines have already indexed that domain name. It is quite possible that, other websites probably still have links to that domain. If the domain is listed in directories, these links will further result in more traffic. The user registers the domain, and the work getting incoming links has already been accomplished for him/her.

2. Surf value

It is quite frequent or rather say occasionally that web surfers hunt by typing generic words followed by dot com (or any other extensions) inducing into their browsers, like for e.g., cats.com. The previously mentioned domain name redirects to the website for a company that involve in selling pet products and services. A domain name as mentioned above constantly brings visitors to the website without spending bucks and sweat on the purposes like advertising and marketing.

3. Simple to keep in mind

In some of the cases the user’s company name does not come in the category which can be easily remembered, but domains for e.g. cats.com or website.com are. It is inarguable that, People are more likely to return to a site or pass on the name to their friends when they can easily memorize it.

The way one can find domains pending cessation

If one has decided to join the gold rush for valuable pre-registered domains. Now here, searching expiring domains is the first step, but one also need to research domains that are about to come back on the market.

Lists of domains pending expiration

At these websites, among others, one can search for domains containing keywords he/she enters. At website like expireddomains.com, the results contain domains that are currently available, soon to expire, on hold, in the Redemption Grace Period (RGP), or for sale by their registrants. Extensions that are quite often searched are .com, .net, and .org.

The domainsbot.com database searches .com, .net, .org, .info, and .biz extensions for domains that are available, for sale, or expiring.

Domain research

One can find some incoming links to a domain by entering “link: siteURL” into Google or Yahoo. Now when one gets the links, he/she should follow them to see what types of sites link to the domain. One very important question which comes at this point is how would a user feel about having these particular sites linking to his/her site?

Also one should look into any possible problems associated with the domain. In case the previous site had controversial search engine optimization techniques employed like use of hidden text or links, search engines may ban the domain. One should check the history of the site at a domain name via the Way Back Machine. If the domain previously was pointing to a site with gambling or adult content or a lot of affiliate links, or if it employed questionable search engine optimization techniques, search engines may here ban the domain. Besides there is possibility of a domain being banned, there are also chances that one may not get incoming links from sites associated with these types of contents.

Questions related to domain:

There are several questions which arise in mind of user like:

How to register domains pending deletion?

How to maximize choices if one has already selected a domain of his/her choice and now wants it?

There are several sites like eNom.com’s Club Drop, where one can bid on expiring .com and .net domains the day before they’re available to the public. One can also be notified when domains matching his/her search criteria become available.

The NameWinner system places bids on .com, .net, .org, and .info domains for the user. The best part of it is it bids only as high as is necessary to maintain one’s high bid position up to your maximum bid.

How to avail profit from one’s domains

By selling domains

If one is having a domain that is valuable for anyone else but not for the user, in that case the user can benefit from it by selling it at auction. If one is already having a client for hiss/her domain, he/she can transfer it securely through Escrow.com.

Domain monetization

With paid domain parking programs, also called “domain monetization” or “monetize domains,” one can earn pay-per-click income via targeted advertisements. The following are names of some of the sites offering such services:

- DomainSponsor

- Park Quick

- Domain Spa

- Google Adsense for domains

Thus with right knowledge, timing, and a bit of luck, one can have possibility of earning a lot by domain.

6 steps to Adsense Domination


When you make your living online, you realize the need for multiple streams of income.

One of the easiest and most lucrative ways to generate a secondary income, which also happens to be passive, is via Google’s Adsense program.

I’m sure you’ve read the claims of a few individuals generating five figure monthly incomes from Adsense. For many of you, I’m sure you are wondering why you aren’t making this same income yourself.

Well, wonder no more. If you follow my simple six step system, you will be well on your way to healthy Adsense profits within three months.

Are you ready? It’s now time to pay attention.


Step 1 – Preparation.

The key to making money with Adsense is all about numbers. BIG numbers!

Sure, there are a few people making serious money with less than ten sites, but these are the exception.

Your goal will be twenty-four sites in three months. That’s just TWO sites per week!

In order to accomplish this, I recommend one of the many available page generation tools available today.


Step 2 – Determine Your Markets.

In order to maximize Adsense income with only twenty-four sites, you must know which markets are paying well.

To break this down even further, you need to know which keywords within those markets are paying the most.


Step 3 – Register you domains.

Once you’ve identified and chosen your markets, you must register domains appropriate to those markets. For example, if your market is ‘Cabbage Patch Dolls’, a domain such as http://www.cabbage-patch-doll.com/ would be appropriate.


Step 4 – Create your site.

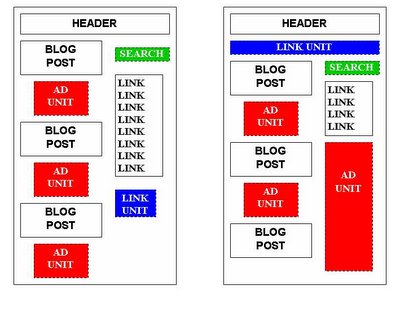
Using your favorite page generation software and keyword list, it’s time to develop your site. There are several key points to bear in mind when you develop these specifically for Adsense.

1. Format – Always use the large 336×280 large rectangle.
2. Border – Match the same color as your background.
3. Background color – Border – Match the same color as your background.
4. Link = “0000CC”
5. Color_url = “999999″
6. Color_text = “333333″
7. Position – Far left or center and just above the page fold (Top 25% of site)


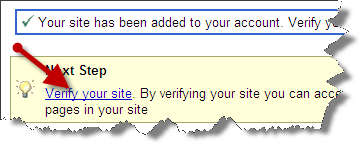
Step 5 – Verify and track your site

Visit your site and make sure all links work and that the sites appear to your satisfaction. You should also check out the ads Google is displaying. Are they targeted to your primary high paying keyword? If not, recreate your site using your high paying keyword in a higher density throughout your site.

Make sure you track your Adsense format, position, and traffic with a tracking system specifically designed for Adsense. Once you know your stats, you can adjust for maximum clickthroughs and higher revenues.


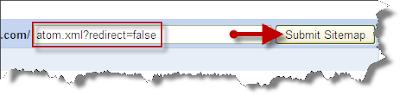
Step 6 – Get your site listed in the search engines.

This is simple… no tricks involved. Simply rent links to your site. A PR7 or PR8 link will do the job.

While I’ve simplified the process here, you are now armed with enough information and resources to make some serious money with Adsense.

Sunday, October 4, 2009

How do I add a Blog List to my blog?

Do you have a list of your favorite blogs that you want to share with your friends? Well now you can do that and more with the Blog List gadget! A Blog List, also known as a Blog Roll, is a list of blog links with a live view of the most recent posts from each blog. It's really easy to add a Blog List widget to your blog. First go to the Layout | Page Elements tab for your blog:

Click the "Add a Gadget" link that appears in the sidebar of your layout. You'll then see a popup window with all the different types of Gadgets you can add to your blog. Look for the one called "Blog List" and click on the blue "+" icon:

You can then enter your desired title for your Blog List, select how you'd like you Blog list to be sorted (alphabetically or most recently updated) and how many blogs you'd like to show in you list.

You can then select if you'd like to show an icon with each blog, the title of the most recent item, a snippet of the most recent item and the date of last update.

Once you have configured all the options, you'll need to add your favorite blogs to the list! To do so simply click on the "Add a blog to your list" link. You'll then be promtped to add a blog by URL or import a blog from Google Reader:

Once you have added your desired URLs and blogs to your Blog List, click the orange "Save Changes" button and your Blog List will be ready to view!

Add Blogger Sitemap to Google Webmaster Tools!

Google Webmaster Tools help your customers understand site traffic and diagnose potential problems by providing insights into how Google crawls and indexes their site.

Webmaster Submission Guide

Submitting the Sitemaps of your blog to Google Webmaster helps the search engine(Google) to crawl your webpage's easily and more quickly! This post explains the procedure to add your blogger blog's sitemap to the Google Webmaster Tools.

  1. Sign-in to Google Webmaster Dashboard using your Google Account.

  2. Type your blog URL and click Add Site:
    Add Blogger Sitemap to Google Webmaster Tools


  3. Once your site is added to Google Webmaster, you need to verify the site by adding a Meta Tag to your blog:
    Add Blogger Sitemap to Google Webmaster Tools


  4. Copy the Meta Tag code given by Google Webmaster as shown in the screenshot below:
    Add Blogger Sitemap to Google Webmaster Tools


  5. Now go to Blogger Dashboard - Layout - Edit HTML - then search(Ctrl+F) for the code given below in the header section:


  6. Then Paste the Meta Tag just after the above code and Save the Template.

  7. Now click Verify in the Google Webmaster Tools. Your site will be verified if you followed the above steps clearly:
    Add Blogger Sitemap to Google Webmaster Tools


  8. Next step is to add sitemaps of your blog. Select Sitemap from the left sidebar:
    Add Blogger Sitemap to Google Webmaster Tools


  9. You can add the following sitemaps of your blogger blog to the Google Webmaster:
    http://www.YourBlog.com/atom.xml?redirect=false

    http://www.YourBlog.com/feeds/posts/default?=rss

    Add Blogger Sitemap to Google Webmaster Tools

  10. Finished! Your Blog's sitemap will be added to Google now!

Google Adsense Wordpress Plugins

Listed below are 10 best Adsense plugins which help you work smarter with wordpress.

  • Adsense Deluxe - offers advanced options for managing the automatic insertion of Google AdSense or Yahoo Publisher Network (YPN) ads to your WordPress posts. Easily switch all AdSense ads to a new color scheme across the entire site.
  • Adsense Injection - inserts Adsense code randomly into a pre-existing blog. Takes a random paragraph (or br tag) break in your article and inserts adsense code. It does one per story on multi-post pages (home, archive, category) and let’s you pick how many to show on single post pages.
  • Adsense Inline - inserts Google adsense in blog posts.
  • Shylock Adsense WordPress plugin - allows you to insert Adsense ads on your blog without modifying the template. Set it up to show different Adsense ads for articles older then ‘n’ days. E.g. insert a 468×60 ad at the bottom of a new article for regular readers, and replace with higher paying 336×280 ad after 7 days for the search engine visitors.
  • Adsense Beautifier - makes your Adsense look beautiful by placing images beside them to increase your clicks (CTR) and subsequent Adsense earnings. (May not be compliant with Adsense TOS now)
  • AdSense Widget for WordPress Sidebar - Google AdSense widget designed for the new WordPress Sidebar Widgets plug-in.
  • AdRotator Wordpress Plugin - rotates your adsense ads with other affiliate programs like Chitika Eminimalls wherever you want. Helps to reduce ad blindness and test different ad formats and affiliate programs.
  • Adsense Earnings Wordpress Plugin - displays your adsense earning details within wordpress admin panel.
  • AdSense Manager - is a Wordpress plugin for managing AdSense ads on your blog. It generates code automatically and allows positioning with Widgets.
  • AdSense Sharing Revenue and Earnings System - allows you to view your adsense earnings and share your adsense impressions with your friends and co-authors.
  • Author Adsense Wordpress Plugin - allows blog authors to enter their Google Adsense Publisher ID and have ads displayed on their own posts generating revenue. Admin can set the ratio of author’s ads to admin ads.
  • Author Adsense MU Plugin - Webmasters of Wordpress MU sites can generate adsense revenue from hosted blogs as this script allows you to set an admin ID and the ratio of admin ad’s to blogger’s ads.
  • Google Ad Wrap - wraps posts and comments inside Section Targeting tags for better targeted ads.
source : http://freeadsensesource.com/

Thursday, October 1, 2009

4 Tips to Improve your AdSense revenue

How many times have you seen an ad campaign running for “Google Adsense” that makes it sound so easy to make revenue by just copying and pasting their code onto your website? After all the research I have done on Google Adsense, I finally realized how it is not that easy just to copy and paste. There is much more beyond this that must be done in order to make Google Adsense revenue.

The following are techniques that must be implemented in order to really make money with Google Adsense:

  1. Design a website that is Google Adsense friendly. In other words, make sure that your website has much content that is keyword rich and make sure your keyword density is decent. Make sure that you are using the most beneficial keywords for your niche. Try to choose keywords that cost more for pay per click. For example, if a keyword such as “dog training” cost $2.00 per click to run an ad campaign, you can be well assured that you will make around half of that per click. By choosing the top competitive keywords, you will increase your Adsense revenue considerably. Once indexed, Google will then be able to known what correct ads to place on your website.
  2. Generate traffic to your website using a number of different techniques.
    • Writing articles
      By writing articles at least once a week and submitting them to article directories such as Ezine. The more article directories that you submit to, the more back links you are creating for your website. You can pay for article directory submission, which can cost as little as $80 every quarter.
    • Search Engine Directory Submissions
      By submitting your website URL to search engine friendly directories, you are creating back links back to your website. Make sure that you only submit to search engine directories with a Google page rank of four or higher. You can pay around $11.00 per website to submit to 100 directories with a page rank of four or higher. Create ads: By publishing classified ads, you are advertising your website and creating back links back to your website. US Free Ads and Domestic Sale are two places that you can submit your ad to for free.
    Just remember back links, back links, back links!
  3. Google Adsense ads can be published and designed in a wide variety of formats. When displaying your ads, decide upon a size that would be best suitable for your website. There are different sizes to choose from. There are also different fonts and colors you can use to create your ads. Try to use a color that blends in well with your website. Also, although borders can be used, many web publisher's state on forums and blogs, that once they removed their borders, they had more clicks on their ads.
  4. When displaying ads on your website, it is best to place them in a place where visitors can review them. One good place to display your ads is somewhere at the top of your website. A lot of web publishers use the top left corner for displaying Google Adsense. However, when you go to a website, what is one of the first things you look at? Could it be how the website is navigated by its menu? That is why another great place to display your ads could be near the navigation menu.

Earning revenue with Google Adsense takes time, patience, and trial and error. The more you read about how Adsense works for others, the more you will understand how it will work for you.

Optimize Google Adsense For Blogs

How many times have you tried altering the placement of your Google AdSense ads to get a better click through rate and make extra money.

Google Adsense blog’s article Blogtimize presents some tips that will help you place the ads on your blogs better and get a higher CTR and earn more money.

Using these images they demonstrate the best position for your ad units. And other notable tips are Choose the right ad formats, Place ads where your readers will notice, Improve targeting and Customize your ad colors.

Tuesday, September 29, 2009

All about the Blogger 'Monetize' tab

The Monetize tab in Blogger makes it easy to enable AdSense ads on your blog. Once enabled, Blogger will retrieve your AdSense earnings data directly from AdSense so you do not need to go to AdSense to get basic earnings information.

AdSense Reports

Once you start generating AdSense impressions, you will begin earning money when people click on ads that show on your site.

The earnings report (visible when you click on the Monetize link from your Dashboard, or the Monetize tab when viewing your blog while logged into Blogger) includes a drop-down bar with Today, Yesterday, Last 7 Days, This Month, Last Month, and All time.

Selecting an option will retrieve the relevant report directly from AdSense.

All time

If you are already an AdSense user, you will notice that Blogger created a new channel (with the URL of your blog) in your account. If you have had AdSense ads on your blog before using Blogger’s AdSense integration to insert ads into your blog, it is important to note that All time will retrieve data only from the time you connected Blogger to your AdSense account.

This in no way affects your overall AdSense reporting, available directly from AdSense.

Terminology

The AdSense report visible from the Monetize tab contains basic information about how many ads have run on your blog, how many clicks were generated, and how much revenue you have earned. Each term in the report is defined below:

  • Page impression: A page impression is generated every time a user views a page displaying Google ads. We will count one page impression regardless of the number of ads displayed on that page. For example, if you have a page displaying three ad units and it is viewed twice, you will generate two page impressions and six ad unit impressions.
  • Clicks:# The number of times an ad was clicked on in the given reporting period.
  • Page CTR (Clickthrough Rate): The number of ad clicks divided by the number of impressions for the page of ads that appears when a link unit is clicked.
  • Page eCPM (Effective Cost Per Thousand Impressions): Calculated by dividing earnings by number of page impressions and multiplying. This makes it easier to compare multiple sites to see which are performing better.
  • Earnings:
  • Total revenue earned to date. More detail about earnings is available in the AdSense Help Center.

    How does Blogger Mobile work?

    You send a message - which can be a photo, some text, or both - to go@blogger.com. We take care of the rest. In other words, we auto-provision a new blog and publish the post. It's that simple.

    Here's how to start a mobile blog:

    1. Text REGISTER to BLOGGR to create your mobile blog. The text and/or photo in your message will be uploaded to that blog right away. We'll message you back with the address, (so you can visit your new blog on the web) and a token (so you can claim your blog and access it from your account).

    2. OPTIONAL - If you feel like changing anything on your new mobile blog or if you already have a Blogger account and want the posts to go to your existing blog, you can log in to go.blogger.com and enter the token we sent to your phone. You'll then have the option to claim your new mobile blog and merge it with your existing blog. Note to users whose blog address does not contain blogspot.com: Once you make the aforementioned switch, new mobile posts will be published to your chosen blog but mobile posts published prior to the switch will not be moved over automatically.

    What types of messages can I send to Blogger Mobile from my phone?

    MMS, SMS, or Email - note this doesn't include email sent from a mobile device that actually passes through a webmail gateway (such as mail sent from your stanford.edu account from your phone).

    What size photos can I send?

    Photos are currently limited to 250K each. If they exceed that size, you'll receive a bounce message letting you know so you can try again with a smaller picture. Note that your phone (or carrier) might have size limits of its own.

    Is there a cost for using Blogger Mobile?

    Mobile providers' standard rates for sending and receiving text and photo messages apply. Blogger won't charge you for any of its services.

    Requirements

    Text messaging-enabled mobile device with a text messaging plan. This service is free from Google but charges from your carrier for usage may apply.

    Notes:

  • To cancel text message replies, text STOP to BLOGGR
  • To unlink your device from Blogger, text UNREGISTER to BLOGGER. You are free to then register with another blog if you wish.
  • For more information, send the keyword HELP to BLOGGR (256447)
  • How do I post to blogger via email?

    The Mail-to-Blogger feature turns any email account into a blog-posting application. In Settings | Email you can create a Mail-to-Blogger address which you will use to send posts via email to your blog:

    Settings | Email tab

    To post to your blog via email, you need to configure your Mail-to-Blogger email address in Settings | Email:

    The format of the email address is username.secretword@blogger.com. Note that this email address must be kept secret. Otherwise, anyone who gets it will be able to post as you.

    Also be sure to specify whether or not you prefer your email posts to publish automatically. If this option is not checked, then your posts will be saved on your account but will not appear on your blog until you log in to Blogger.com and publish them yourself.

    Once you have saved your Settings, you can send email to your blog. The subjects of your email letters will be the titles of your posts, and the body of the emails will be the posts themselves. To include an image in your post, you can attach an image to you your email.

    Notes:

    • Sometimes email programs append text to the bottom of each sent message; to make sure this cruft doesn't get posted to your blog, put #end at the end of your post.

    Top amazing Tactics to Increase Blog Traffic

    here are the best Simple Ways to Get Your Blog Noticed in the Blogosphere !

    The blogosphere is a big and busy world with over 100 million blogs and growing. How do you attract visitors to your blog? Follow these simple tips to drive traffic to your blog.

    1. Write Well and Write Often

    Frequently updating your blog with useful content is the first step to building your blog's audience. The content you write is what will keep readers coming back for more. Make sure you have something meaningful to say to them and say it often to maintain their interest and keep them loyal.

    Furthermore, post frequently to increase the number of chances you have for your blog's content to be noticed by search engines such as Google or Technorati.

    2. Submit Your Blog to Search Engines

    Get on the radar screen for the popular search engines such as Google and Yahoo! by submitting your blog's URL to them. Most search engines provide a 'Submit' link (or something similar) to notify the search engine of your new blog, so those search engines will crawl it and include your pages in their results.

    It's important to understand that simply submitting your blog to search engines doesn't mean your pages will appear at the top of a Google search results screen, but at least your blog will be included and will have the chance of being picked up by a search engine.

    3. Use and Update Your Blogroll

    By adding links to sites you like in your blogroll, the owners of those blogs will find your blog and will be likely to add a reciprocal link in their blogrolls. It's an easy way to get the link to your blog in front of many readers on other blogs. The hope is that some of those readers will click on the link to your blog on the other blogs' blogrolls and find your content interesting and enjoyable turning them into loyal readers.

    4. Harness the Power of Comments

    Commenting is a simple and essential tool to increase your blog's traffic. First, respond to comments left on your blog to show your readers that you value their opinions and draw them into a two-way conversation. This will increase reader loyalty.

    Second, leave comments on other blogs to drive new traffic. Make sure you leave your blog's URL in your comment, so you create a link back to your own blog. Many people will read the comments left on a blog post. If they read a particularly interesting comment, they are highly likely to click on the link to visit the commentor's website. It's important to make sure you leave meaningful comments that are likely to invite people to click on your link to read more.

    5. Syndicate Your Blog's Content with an RSS Feed

    Setting up an RSS feed button on your blog makes it easy for your loyal readers to not just read your blog but also know when you publish new content.

    6. Use Links and Trackbacks

    Links are one of the most powerful parts of your blog. Not only are links noticed by search engines, but they also act as a tap on the shoulder to other bloggers who can easily identify who is linking to their sites. Linking helps to get you noticed by other bloggers who are likely to investigate the sites that are linking to them. This may lead them to become new readers of your blog or to add links to your blog from theirs.

    You can take links to other blogs a step further by leaving a trackback on the other blog to let them know you've linked to them. Blogs that allow trackbacks will include a link back to your blog in the comments section of the post that you originally linked to. People do click on trackback links!

    7. Tag Your Posts

    It takes a few extra seconds to add tags to each of your blog posts, but it's worth the time in terms of the additional traffic tags can drive to your blog. Tags (like links) are easily noticed by search engines. They're also key to helping readers find your blog when they perform searches on popular blog search engines such as Technorati.

    8. Submit Your Posts to Social Bookmarking Sites

    Taking the time to submit your best posts to social bookmarking sites such as Digg, StumbleUpon, Reddit and more can be a simple way to quickly boost traffic to your blog.

    9. Remember Search Engine Optimization

    When you write your blog posts and pages, remember to optimize your pages for search engines to find them. Include relevant keywords and links but don't overload your posts with too many relevant keywords or completely irrelevant keywords. Doing so can be considered spamming and could have negative results such as your blog being removed from Google's search entirely.

    10. Don't Forget Images

    Images don't just make your blog look pretty, they also help people find you in search engine listings. People often use the image search options offered by Google, Yahoo! and other search engines, and naming your images with search engine optimization in mind can easily boost your traffic.

    The blogosphere is a big and busy world with over 100 million blogs and growing. How do you attract visitors to your blog? Follow these simple tips to drive traffic to your blog.

    11. Consider Guest Blogging

    Guest blogging can be done when you write a guest post on another blogger's blog or when another blogger writes a guest post on your blog. Both methods are likely to increase traffic as your blog will be exposed to the other blogger's audience. Many of the other blogger's readers will visit your blog to see what you have to say.

    12. Join Forums, Web Rings or Online Groups

    Find online forums, web rings, groups or social networking sites such as Facebook and LinkedIn where you can share ideas and ask questions of like-minded individuals. Add a link to your blog in your signature line or profile, so each time you post on a forum or participate in another online network, you're indirectly promoting your blog. Chances are many people will click on that link to learn more about you.

    13. Promote Outside Your Blog

    Promoting your blog shouldn't stop when you step outside the blogosphere. Add your blog's URL to your email signature and business cards. Talk about it in offline conversations. It's important to get your name and your blog's URL noticed offline, too.

    14. Nominate Yourself and Other Blogs for Blog Awards

    There are a number of blog awards given out throughout the year. Nominating yourself and other blogs and bloggers can draw attention to your blog and drive traffic to it.

    15. Don't Be Shy

    The most important part of the blogosphere is its community and much of your success as a blogger will be tied to your willingness to network with that community. Don't be afraid to ask questions, join conversations or just say hi and introduce yourself. Don't sit back and hope the online world will find you. Speak out and get yourself noticed. Let the blogosphere know you've arrived and have something to say!

    Thursday, September 17, 2009

    How Google Adsense Generates Money?

    google-adsense2

    Google Adsense is one of the most popular ways that owners of a website can make a continual stream of money. If you have your own website, multiple websites or you are considering developing some in the future, it’s likely that you already have heard about Google Adsense. You may not however understand how it actually works and whether or not it can truly provide a decent mount of money.

    The way that Google Adsense works is you place a piece of code on your website. This code, run by Google, determines the content of your page based on the text and then delivers ads that are targeted to match that kind of content, on whatever topic or niche you are covering.

    In this way, you end up displaying ads that are extremely relevant to what you are mentioning, which means that your visitors are going to be naturally more interested in the ads than if they were completely random and unrelated. As anyone from any area of marketing can tell you, delivering highly targeted ads to already interested prospects is going to turn in drastically better results than a massive, one size fits all approach.

    As the owner of a website, when you place some Google Adsense ads on your site, you make money each time somebody clicks on one of the ads you display. These clicks have very different values depending on what the ads are and what your particular niche, topic or industry is. For a low paying niche or one that doesn’t have very many advertisers, one click may only earn you a few cents. However, other clicks can be worth $5 or even $10 at a time, making your earnings potential quite large.

    Therefore, if you want to develop a website based around Adsense you first have to research the market. There are a variety of ways to see how popular certain keywords and niches are, as well as seeing how expensive the ads for those keywords are to buy. Using the correct tools to help figure this out will prove to be an extremely important way to conduct research and develop a new site.

    The placement of your ads on your site is also extremely important. You can place Google Adsense ads anywhere on your site, and the ads themselves come in a variety of different sizes to fit different situations. You’ll also be able to customized the appearance of the ads in terms of colors and fonts, which is important for fitting in with the design of your website as a whole. Well placed ads that match the visual appearance of your website will produce much better results.

    Using Google Adsense can be a way for your website to earn a substantial amount of income. It can be a supplement to your other income streams, or you can research and plan a website devoted entirely to earning a passive income stream from Adsense. Understanding how the process works and committing yourself to taking the time for research and customization will go a long way towards increasing your success and your earning.

    How to Add Recent Posts Widget to Blogger


    It's the fact that Feedburner always helped the bloggers or webmasters with their variety of useful services like Free Email Subscription service, RSS reader, PingShot services, FeedFlare, SmartFeed and so on. This post explains how to add Recent(latest) Posts Widget to Blogger(blogspot) blogs using Feedburner's BuzzBoost service.

    Do the following steps:

    1. Sign-in to your feedburner account and select your blog from My Feeds:
      How to Add Recent Posts Widget to Blogger

    2. Click Publicize tab from the top menu:
      How to Add Recent Posts Widget to Blogger

    3. Then select BuzzBoost from the left sidebar:
      How to Add Recent Posts Widget to Blogger

    4. Next you have to chose the number of recent posts you want to show, then select the optional items from the list and click Save:
      How to Add Recent Posts Widget to Blogger

    5. Now you have to Select the widget code from the top box and Copy it:
      How to Add Recent Posts Widget to Blogger

    6. Then go to Blogger Layout Page - click Add a Page Element/Add a Gadget - select HTML/Javascript - then Paste the code and click Save. Finished!

    You will see your Recent Posts Widget according to your Template's design and color! Happy Blogging!2 Thumbs Up

    Wednesday, September 16, 2009

    Desain Wizard

    I have been trying to add my adsense widget to my blog and when I get to the Design Wizard there is not a link to settings so I cannot get to section 2 - Modula - anyone know what I should do next? I only have
    1 Layout
    2 Widgets
    3 Style
    4 CSS

    I have tried to copy and paste html but it wont accept it ?

    Tips to Make Blog Adsense

    Are you an Adsense user? Or have a plan to join Adsense? Last day I found some useful tips from Adsense blog about maintaining an AdSense-friendly site with user-generated content!

    Having an inappropriate content in your blog or website is against the AdSense program policies. Inappropriate content can be any images, forum posts, comments, links etc. It may also include sexually explicit forum posts or spam bot comments with links to adult sites.

    Top tips to make your blog Adsense-friendly are mainly categorized under two heads namely 'Prevention' and 'Monitoring'.

    Prevention

    1. Publish clear content guidelines and policies that your users will have to accept and adhere to in order to sign up and use your site's services.
    2. If you own a photo or video sharing site where users are permitted to upload adult or other non-compliant content, clearly structure your content to avoid placing your ad code in sections/categories containing this type of content. The same idea could also be easily applied to online stores with adult sections or to classifieds sites which offer adult dating classifieds.
    3. Ask users to tag their inappropriate content (e.g. sexually suggestive pictures or videos) as being non family-safe. This can help you perform human evaluations of potentially inappropriate content for AdSense ads. You can also try installing keyword filters for content related to adult topics, violence, or drugs, for instance. While we're unable to provide you with details about setting up these filters for your site, we recommend searching for terms such as "keyword filtering" or "content filtering" on Google.com.
    4. Implement spambot protection for your comment forms, forums, and guest books. If you need more information on this topic, try a Google search for "spambot protection".

    Monitoring
    1. Set up ways for your community to monitor itself. For example, try adding a "Report inappropriate content" link to your pages, to allow users to flag content for you to review.
    2. Proactively review pages, videos, photos, etc. with high pageviews on a regular basis.
    3. Spot-check content based on keywords, content search, or related user accounts. For example, try entering keywords related to inappropriate content in your own search engine and checking the results. Alternatively, you can search on Google.com using the following parameter, replacing 'example.com' with your own site's URL and 'keyword' with a specific word or phrase: "site:example.com keyword".
    4. Create editorial policies and exercise moderator control in your comments, forums, and guestbook sections.

    adsense on my blog

    First of all, choose the blog that you want to put AdSense on, and go to the Layout | Monetize tab. You can get there by clicking the Layout link on the dashboard, or clicking the Template tab from the posting or settings page of the blog.

    Once you're there, choose one of the three options to display your ads: in your sidebar and posts, just in your sidebar, or just below your posts.

    The next page asks you to either sign up for a new AdSense account or use an existing one. Once you've signed in or created or account, you'll get a confirmation screen. If for any reason you need to switch to using a different AdSense account, click the switch AdSense accounts link on this page.


    Bookmark and Share
     

    adsense blogs Copyright © 2009 Premium Blogger Dashboard Designed by SAER